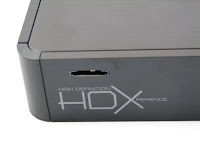
 This is the 2nd part of our HDX 1000 review. In this article, we are going to run through a high-level functionality test which covers installation, start up sequence, GUI and playback functions. We will put our suggestions and tips of operation in the article, as well. This can also be used as a user quick-start manual.
Testing Goal
A high-level functionality test will be performed to see if HDX-1000 can accomplish the core benefit of a digital media streamer: playback a digital media file stored in a remote content library. (In the test, a HD content will be used because HDX1000 is designed to be capable of decoding the H.264 HD file format).
Installation
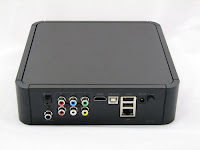 Installing HDX 1000 is a breeze. Just follow the below steps, and you can have the box ready to go in 10 minutes.
1. Connect AC power adapter, network cable and A/V cables to the back panel of HDX 1000.
2. Put batteries into the remote control unit.
3. Turn on the power switch.
4. Grab your remote control unit. Sit back on your couch. You are ready to rock.
One thing to be noted is that HDX 1000 is designed by the HDMI v1.3 standard. Be sure to grab a v1.3 cable if you want to use HDMI interface to connect HDX 1000 to your home entertainment system. It will help you maximize the full potential of your HDX 1000.
HDX 1000 Start Up Sequence
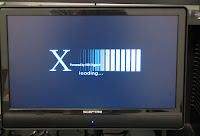 Right after the power button on the back of HDX 1000 is pushed, you can see a “X power by HD Digitech” message on the screen. The message can stay on the screen for around 60 seconds. Then, you will see the screen switching between “black screen” and “no signal” mode for about 30 seconds. Because the “black screen” mode output is black and the “no signal” mode output is bright blue, it is kind of annoying to watch the screen flickering back and forth between dark and bright colors. Here is my first suggestion to HD Digital Technology: it might be better to disable the output or keep it in a dark black color during this 30 second period. There is a big chance that an inpatient user like me will hit the reset button during this confusing period and not allow the box to fully start-up.
Anyway, there are many components in the HDX 1000 box to be woken up during the turn-on sequence. The whole process will last for around 90 seconds. Don’t go into panic mode if you wait longer than you expected.
Welcome screen / GUI Root Menu
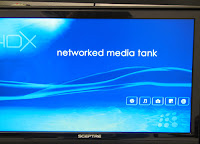 After successfully booting up HDX1000, users can see the welcome screen and the GUI root menu appear on the screen. On the left-hand side, there are three main function categories: media source, web services and setup. This article will be focused on the “media source” function. (The latter two functions will be covered in upcoming reviews.) Comparing to the GUIs from other digital media streamers, this interface (from Syabas NMT player solution) is actually the most clean and simple one we have ever seen. Hence, it can generate the most straight-forward menu navigation experience.
Discover and Browse Digital Content Library
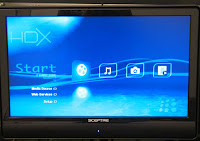 When using HDX 1000, there are several places where people can store their content library. It can be in a PC residing in the same network, in an external storage device (such as USB HDD, USB Flash Drive or SD Memory), or in a HDD installed inside the HDX 1000. I will focus on the first method and leave the introduction of the latter two in another article so that I won’t create a 10-page monster to bore you.
OK, while leaving the HDX 1000 on, please move back to your PC. There are works to do to make your HDX 1000 and PC talk to each other.
1. Go download and install the Window Media Player if you don’t already have one running on your computer. The link to download the page is at Here.
2. Bring up the Windows Media Player 11 (WMP11).
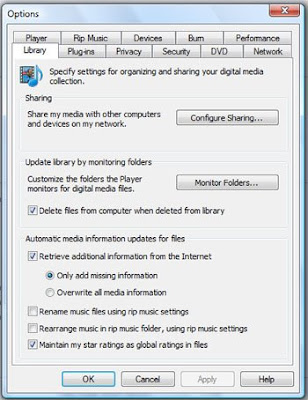
3. Click on the Library button on the WMP11 tool-bar. Then, click on “More Options”.
4. Click on the “Configure Sharing” button in the Library tab.
5. In the new pop-up Media Sharing window, activate the “Share my media to” option in the sharing settings section.
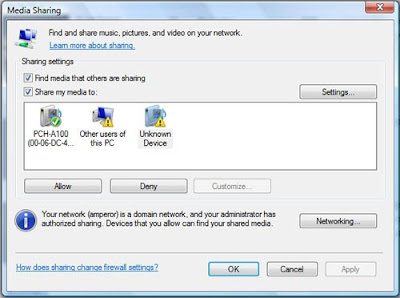
6. You should be able to see the PCH-A100 (XX-XX… Mac address of your HDX 1000) icon in the available-neighbors window. Click on the icon and then click on the “Allow” button below the available-neighbors window.
7. Click on the “OK” button to close the Media Sharing window.
8. Click on the “Monitor Folders” button in the Library tab and add-in the folders you store your contents into the monitoring list.
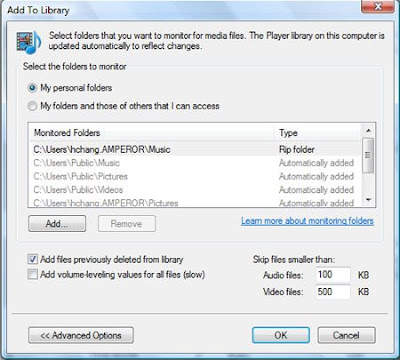
 9. Click on "OK" to finish the setting.
Go back to your HDX 1000. Use the arrow keys on the remote control unit to click on the “Media Source” on the left-hand side of the screen. You should be able to see your computer’s label appear on the media source menu. Click on your computer’s label, select the media file type from the four icons (video / Audio / Picture / Document), and you can start to browse your content library.
One thing to be noted is that you won’t be able to see all the files after selecting the media type icon. In other words, after you click on the video icon, you won’t be able to see any audio type files in the folder. This actually confused me the first time I used Syabas based machine.
 However, after getting used to the settings, I found no problem in locating the file I wanted to play.
(There are other ways to connect HDX 1000 to PC, too. I'll list them later if I have time.)
Playback Functions
After successfully locating the file you want to play, the rest of the operations are intuitional. The “play”, “stop”, “pause”, “fast-forward” and other playback function buttons are all included on the remote control unit. They are also clearly marked so that there is not a big chance you will miss them. In the following, there are several observations I have which might help to improve your remote control smashing experience.
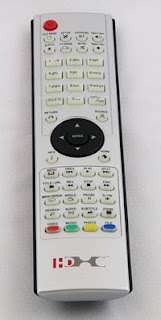 1. “Return” and “Stop” buttons do two different things. When you are in the file browsing mode, the “return” button can bring you back to the previous page. When you are in media playing mode, the “stop” button can stop the playback function. There is no such short-cut as hitting “return” button to stop the media playing and bring you back to the previous browsing page. You need to press “stop” and then “return”.
2. The “fast-forward” and “reverse” playback function can still use some improvement. The display starts to skip frames when the “reverse” function is activated. In addition, depending on the file type, the transition between “fast-forward” and “play” function can sometimes be not smooth.
3. A good feature of digital movies is that every small piece of the movie is indexed by a time frame. While playing the movie, the “left” and “right” arrow on the remote control unit can help you navigate the movie to the time frame you want play, in a very fast way. Now, if you are an action movie fan like me, you can memorize the time index where John McClane takes down the F-35 in Live Free or Die Hard and easily jump to the spot as many time as you want.
Conclusion
We achieved our testing goal with the HDX 1000, which was to playback an HD digital media file stored in a remote content library. It is always good to watch the HD content on a big screen TV. In the next review, we are going to go over the specifications and lift the HDX 1000 cover to see what’s really inside this magic black box.
Read Part 3 of the HDX 1000 Review - Open the Black Box
Go to the HDX 1000 Product Page at AmperorDirect.com


3 comments:
Is the HDX also compatible with a Mac
Yes, it is. You just need to use "PARAGON NTFS For MAC" and "LINUX For MAC".
Christophe
HDX 1000 - Dune HD Center - Popcorn Hour - NMT
www.hdland.fr
Interior Design Bangalore India's finest decorative arts for luxury home furniture and interiors. Our collection is custom created for you by our experts. we have a tendency to bring the world's best to our doorstep. welfurn is Modular Kitchen Indialeading Interior design company that gives exquisite styles excellence in producing and Quality standards. will give door-step delivery and can complete the installation at your home.
Post a Comment